Pages

Showing posts with label Wedding/Anniversary. Show all posts

Wedding Card

This wedding card is something new for me.  I have used ribbon before but not like this.  
I hope you like the simplicity of it.  

I usually have difficulty with the message inside, but not today.  These words came to me rather easily.
I thought they were sooooo good that maybe I should share.


Happy 4th of July,  wishing you hope, love and faith.  Joanie

A Wedding Card


I finally realized that if I made a dimensional card that I could send it in the mail if I used a Priority Mail, United States Postal Service small flat rate box.  It will cost more,  but for special occasions that would be just okay.  The finished size of this card is 5 1/4"  X  8 1/4" the small flat rate box will be just what the doctor ordered.


Items used were as follows:

Spellbinders Nestabilities,  Floral Ovals
CTMH Cardstock,  the color Blush
CTMH Stamp Set, Card Chatter Sympathy  D1476
BoBunny, Pearl Frosted Jewels
Cuddlebug Folder,  Geometric Rings
Cricut Cartridge,  Artiste page 65 the flower shape
CTMH   Glitz Stardust Glitter Gel

I started this card last week working on the flowers.  While I only used three on this card I went ahead and made more for other projects in the future.  I have always liked making the flowers but always hesitated because of the mailing issue.  I used cloth trim and ribbon on this card.  I have allot left from making my Grand Daughter dresses.  She is getting a little older now and Gram needs to tone down all the lace.

Thank you for coming by to check us out, hope you come back soon.  Sending warm wishes for a good week,  Joanie

Just one more !!


Thanks for hanging in there as I had to share all these different looks to this flower.  I think I will put it away now.  Smiles, Joanie

One image different looks 3

 
An Anniversary Card with some Cuddlebug embossing and a MS punch for the decorative edge.
Smiles coming your way, Joanie

One image different looks 2


Here I used MS glitter glue to add a little glitz to the up turned petals.  An MS punch was used for the decorative edge.

Have a good one, Joanie

Anniversary Card


With a little nudging from my Daughter I finally started collecting some Copic Markers.  On this card I colored the flower with the new markers.  Now I know that my work isn't the greatest but I sure have been having a lot of fun.  A little help from a Cuddlebug folder and a background wood mount stamp I was able to show off the flower. 
It has been awhile since I posted, so SURPRISE !!!!  I will be trying to do better I promise.

Have a good one, and THANK YOU for your patience with me as I guess I was taking a little break.
Smiles coming your way, Joanie

Make a Simple Anniversary Card Fast

With the exception of the white bird brad, all supplies used to create this card are from Close To My Heart.


Question: What do you do when you need twenty of one card fast? 
Answer: Run to your Cricut and put in one of the CTMH Cricut cartridges.  :-)
 
In the photo above, I cut out forty hearts from the Art Philosophy cartridge.  Then I used Vineyard Berry and Baby Pink ink to stamp and sponge "Universal Background" stamps onto the hearts.  (Tip: You can fit two, 1 1/2" hearts under one stamp--stamping two of the same pattern at once and making the task go even faster.)
 
A third background stamp (from the same stamp set) was inked in Slate on a piece of 2 1/4" square Slate paper.  The word "Love" comes from an older stamp set, "Heartfelt."
 
 
The hearts were mounted with 3-D foam tape to add a little visual interest.  Other than that, the card was left fairly embellishment free--creating, in my mind, a clean look.
 
 
Thanks for taking the time to stop by for a look!
Blessings,
Brenda

Fun with Gold Embossing


Wet embossing is so pretty and elegant.  Here I just used gold wet embossing and dry embossing with a Cuddlebug folder to complete this card.  The decorative stamp was from CTMH (Dreams Come True) stamp set.  The butterfly was from Hero Arts and it was also embossed in gold.  A gate fold card seemed to add to the overall look of the card.  Some ribbon to tie it closed and it is ready for delivery.

Thank you for stopping by to visit, smiles, Joanie

Calla Lilly in Gold


On this card I used gold embossing powder and then colored the calla lilies with wet perfect pearls.  The effect was what I was looking for and the perfect pearls was so much easier to work with this way.  I will be using it again because it doesn't smudge .  A MS punch was used for the decorative border and a Spellbinders Shapeabilities was used for the sentiment. 

Thank you for visiting today....;-)....Joanie

Twisted Easel Card


Isn't it lovely how the card front is displayed for all to see?  A Twisted Easel Card is a great card fold because people want to show it off on a table, mantle, etc.
 
 
If you would like to learn how to make this style of card, please click here.
 
On this card I used Sorbet ink and Cardstock to add the color.  I found the doily on page 31 of CTMH's "Artiste" Cricut cartridge.  I also used the foliage found on page 54.  The flower was made using the petals or (flower) on page 65.  Don't you think the color "Olive" accented things nicely? 
 
I also did some dry embossing with the Cuddlebug and inked it so very lightly.
 
Thanks so much for your company.....have a super day....smiles.....Joanie

How to Make a Waterfall Fold Card

Do you remember the musical, "Guys and Dolls?"  I loved hearing the song about "bushel and a peck."  When I saw this stamp set, I knew it would make a sweet anniversary card.  Wanting the words to mimic the flow of the song, I stamped and arranged the wording as a waterfall fold card.


I used CTMH patterned paper, Ruby, and White cardstock to create this card.  I also used the "Country Born" stamp set and wooden buttons.


Pull the "tongue" and reveal each layer, one by one.


I suppose, if somebody wanted to, she could also add something clever to the "tongue."


Last layer in the fold.  You'll notice, in a moment, how this image is the one we glue on first when assembling a waterfall fold card.


But let's not get ahead of ourselves.  To begin, you will need several pre-cut supplies:
- A standard-sized card base
- A patterned paper to add pizzazz (optional)
- four 2" cardstock squares (color of your choice)
- four 1 7/8" cardstock squares (color of your choice---remember these will be stamped on)
- 3/4" x at least 3 7/8" cardstock
- 2" x 9" cardstock--scored at 2", 2 3/4", 3 1/2", and 4 1/4"


Stamp your four images (one per 1 7/8" square).  Then attach the square as shown in the picture.  Make sure you attach the very last image you want revealed in the "waterfall."  We'll call it, image #4.


Notice the 3/4" space between the top of image #4 and the next score line.  Apply glue just in that space.  Attach the top of image #3 to that space with glue on it.


Repeat with the next space and the next image, image #2.


Finish with image #1--the first image the recipient will see.


At this point, finish prepping your card base. 
Add the patterned paper if you choose. 
Then, attach the 3/4" strip to the  underside of the bottom of image #4.
See the score line above image #1 in the photo?  Fold the paper back and down.  (Done correctly, it will rest under and just peek out below image #4.
 
 
Now, look at the photo again.  See the 3/4" strip peeking out on both sides of image #4?  Add a little glue to the backside of just the two parts that are showing.  Mount it to the bottom of your card front.
 
Trust me.  That is the only place it gets adhered to on the card front--just those two little parts.
 
Now, try your waterfall by gently pulling on the "tongue."  Be sure to fold along the score lines as they come and go.  Add buttons to finish the card, if desired.


Thanks for stopping by!
 
Blessings,
Brenda


Fluttering Butterflies

Using creamy cardstock and CTMH Bamboo cardstock and ink, I put together this pretty card.


I was so inspired by a card I found on You Tube by Becca of Amazing Paper Grace--butterfly/circle card--that I decided to create one of my own.


The main image (the three butterflies) were cut out on a piece of paper measuring 3" x 7 1/2".
 
You will need to find the center of the long side. 
Next measure out from the center 2 1/4" on both sides of the center.  (This gives you the correct spot in which to start punching out your scallops.) 
You will need to punch the large scallop punch six times. 
Next with the large MS butterfly punch in the center of each circle using the existing marks you used to place your scallops.  Line up and punch.
(Save the butterflies to add later after you have mounted the 3" x 7 1/2" to your base card or whatever you choose to do.)


Again, thank you Becca of Becca Bits for such a lovely and fun card to make.  When I saw the punches I knew I needed to make this card because I actually own both punches.
 
 
I hope you will enjoy making it too.  If you don't have these punches, I imagine you could come up with something simliar using the CTMH cricut cartridges.
 
 
Have a great time in whatever you choose to make today.
:-)  Joanie

Wedding Card


I used the AP & Storybook Cricut Cartridge for all cut work on this card.  I did use a background stamp with Desert Sand ink.  The sentiment was also in Desert Sand and the stamp set used is called Everyday Life. (CTMH)   I went with  a base card of Desert Sand, with Cream used in different areas and also Vineyard Berry.

I was inspired by someone on You Tube for this design.  Don't remember her name, but her work is beautiful. 

Have a great Thursday....Happy Stamping.....Joanie

Wedding Card


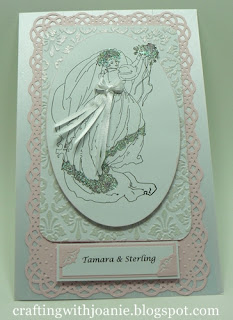
Hello there,  this card was created with a stamp from Stamps Happen Inc. called Victorian Bride.  I used Blush cardstock and black ink for the sentiment and stamped image.  The base card was covered in white satin ribbon and then layered with blush card stock with a MS punch  border.  I then took white card and ran it through the cuddlebug and then using my brayer applied versamark ink and embossed it with white pearl embossing powder.  I added a little ribbon bow to the back of the brides dress and little glitter on the bridal gown and we are ready for the wedding.

Thanks for coming by today.....Have a great week......Smiles.....Joanie

Roxie Anniversary Card


The card was made using the Roxie Paper Packet from CTMH.  I was feeling a little on the wild side when I used this Zebra print.   Too much fun!!!!  I added a small black ribbon along side of the Burgundy ribbon.  A Fiskars punch added a little zip to the boarder.

Thanks for stopping by, have a great day in whatever you are up to.....Sending you a smile....:-)......Joanie

Roxie


I used the CTMH paper packet called Roxie for this project.  I cut out some of the design elements from the paper and added where needed.  I used fabric lace to trim out the fan thingy.  Some black half pearls to help add a little pizzazzzzz. 

Thank you for checking in on my blog today,  Smiles.......  Joanie

Florentine Paper


I used the Florentine Paper Packet for this project.  I cut out some of the images from one paper and added it to another using dimensionals.  I also used a canvas button for the center of the flower.  All these products are CTMH.

Thank you so much for stopping by to see what I have been up to.  Wishing you a great weekend full of crafting ideas and fun.  Smiles coming your way.....     :-)      Joanie 


Wreath Card for an Anniversary

Hello there,  glad you could stop by today.  I have been making wreath cards the past few days and have another one prepared for you to see.


I had prepared these little flowers for another project and didn't get to use them.  So I am so glad that I saved them.  Made this project come together that much faster.  The background paper was something I had.  The flowers were from a CTMH stamp set, and I also used Petal ink and card stock, CTMH.


Thank you for coming by my blog today, have a great week ahead,  Smiles Joanie

Another "V" Card


I decided that I would make another V shape card because I had so much unused embellishments left from the first card.  Here I did not cut it down, and also turned it on its side.  Gives it a little different look.  What do you think?  I think I like this one better, not so busy.  I do get cared away sometimes.

Thanks for stopping by,   Smiles your way,   Joanie

Hand in Hand


This card was made with (CTMH) products.  Paper packet Bliss and Grey Wool.  The stamp set is Everyday Life.  I have been playing with the new Cricut - CTMH cartridge (Art Philosophy).  This cartridge is one of the best I have ever purchased, well worth every single penny.  It is a must have for those working on cards or scrap booking.  I used the flower found on page 21,  I also used the doily found on page 65.  I used Grey Wool ink for the couple, and then added prisma glitter to the flower and the couple. 

Thank you for stopping by, have a wonderful day,  Joanie