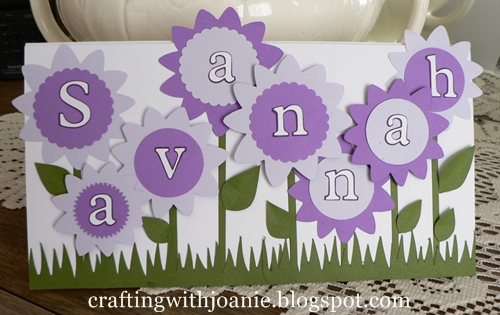

This card was created entirely from the Cricut. The lettering was from the Plantin SchoolBook and also the grass on the front of the card. The balloon's and flowers are from the Stretch your Imagination cartridge. Savannah's favorite color is purple so that explains the color of the card.
To create the inside of this card, you will need to:
- begin with a 10 1/2" x 5 1/2" piece of cardstock.
- Insert the paper into the paper trimmer so that the cardstock reaches the 10 1/2 mark on the extended ruler.
- Slide the paper down to the 4 1/4" mark. Score your first line.
- Slide the paper 1/2" back to the 4 3/4" mark. Score your second line.
- Slide the paper 1/2" back to the 5 1/4" mark. Score your third line.
- Slide the paper 1/2" back to the 5 3/4" mark. Score your fourth line.
- Slide the paper one last time to the 6 1/4" mark. Score your last line.
Got that? Five score lines. You're going to sandwich your flying balloons. But before you get to that part, you'll need to fold along your score lines.
Do Valley, Mountain, Valley, Mountain, and Valley folds. Done correctly, your card now closes into a normal/standard 4 1/4" x 5 1/2" card.
Open the card. Flip it over. If you've done this correctly, your scored lines look like a letter "W" from the side. Run tacky tape to stick the folds together so that the folds disappear and make it look like a normal card. Flip it back over. The inside of the card should now have folds sticking up in the shape of a letter "V."
Cut thin 1/8" strips of acetate to attach your balloons to. Attach them to balloons.
Sandwich your acetate strips (with balloons) in the "V" with tacky tape. To do this, lay one strip of tacky tape on one inside "side" of the "V." Lay your clear plastic acetate strips in the tacky tape so the balloons are farthest away from the tape. Add a second length of tacky tape--this time to the other inside "side" of the "V." Close the "V" to sandwich the acetate and create the "stand" for your balloons.
At this point. Close your card. Now open your card. When it opens, the strips should stand up in the middle.
Thank you for stopping by today, Hope all is well and good with each of you. Have a fun filled crafting weekend. Smile's coming your way. :-) Joanie
26 comments:
How can there be no comments on this post?! It's so sweet! I know this card is going to be appreciated. Way to go! :-)
I know she liked it...
This is awesome. I can't wait to try it thanks for sharing.
Oh wow I love love this card. I can't wait to try it. Fantastic!
I just love pop up cards, and yours is such a unique twist on a great card technique. Thanks so much for sharing your talents and your great tutorial.
Thanks so much for the tutorial! Gotta go try this! Unique & easy!
This is the coolest card. So very clever. Thanks for the how to.
Just saw this on facebook. It is awesome. Hope I can figure it out as I would love to make one.
I am just reading this and can't wait to try it! I can see flowers or clouds besides balloons floating through the air!
Mari S.
Joanie, Saw this on FB. Love the card and the fact that it's all done with the Cricut!! Can't wait to make the card. Agree with the Mari S. to apply this idea with clouds, butterflies. Thanks for the inspiration!!
Thank you for this tutorial. I love the card. It will do well with kites & flowers as well
This is so cute. Do you have any closeup pictures the folds and placement of the balloons? I'd love to see more. Great job!
Thank you for a great idea!!
I used it for a birthday but then also used hearts for an anniversary. They LOVED it!
Just tried making your card. Love it. Thanks for sharing your talent and creativety.
What type of acetate? I tied and my balloons just flopped over...would not stand up straight...??
I don't have a Circuit so I am doing this by hand. If it doesn't work out with the balloons I'll do something else in it's place. But thanks so much for the tutorial!
I don't have a Circuit so I am doing this by hand. If it doesn't work out with the balloons I'll do something else in it's place. But thanks so much for the tutorial!
I have impressed with this post. Thank you so much for this post. I want to let you know that I have batter content for Printing Services for more information Pop up Stand Printing Thanks again
What is the acetate you used? Where do you buy it?
erg saaaai
🌹🌹🌹🌹🌹🌹🌹🌹🌹🌹🌹🌹🌹🌹🌹🌹🌹🌹🌹🌹🌹🌹🌹🌹🌹🌹🌹🌹🌹🌹🌹
I realize this is an older blog post for this card...2015 I believe. But I came across it and just loved it. I'm making several of them right now. Two are especially for two of my grandkids...a granddaughter who will be 16 next week and a grandson who will be 15 at the end of this month (March). I had to guess at the size to cut the balloons. I made three different kinds including one of those longer tube type balloons. I also made them in about 10 different colors. I made 16 for the girl and 15 for the boy...to match their ages. I decided to make several of these cards slimline size. I also used Cricut acetate because it's sturdy to hold the balloons. Thanks so much for the wonderful idea. I plan to take a peek at all your creations. I pray you are still creating cards. I've only stopped at this particular blog post!
Just to let you know...this neat idea is still great...August 16,2021
OMG I love this, I need to make a birthday card for MY Savannah and this is PERFECT! Fabulous job!
Can you tell us the dimensions for the flowers and balloons please
First,tried making it as stated turned out rather boring. So will do another and jazz up. I've seen same idea that had other items that were far more embellished.
Post a Comment