Pages

Showing posts with label Flowers/Bows/Etc.. Show all posts

How to Make an Offset Scallop Flower

This flower uses two sizes of scallop circle punches intentionally offset to create a full and shabby chic flower.


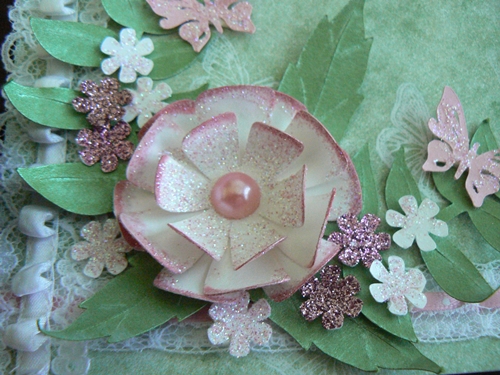
This card was left very simple to accent the flower.  I pulled colors from Color Dare # 31 at Color My Heart.  (It's a fun weekly color challenge site using CTMH products.)


As I see it, you can either use the Cricut and cut two different sizes of scallop circles OR you can use two scallop circle punches.  I have the punches handy, so that is what I used here.  (Note: The larger one is CTMH and the smaller one is from Hobby Lobby and perfectly matches in number of scallops.)

You will need six of the larger size and three of the smaller size.


Stack one size of scallops and use a piercing tool to punch an intentionally OFF CENTER hole through all the circles.  (I'm off at least 1/8" but closer to 1/4" here.)


Repeat with the other size of scallops--again making sure to intentionally offset the hole through all the circles.

(At this point, you may want to use a sponge dauber to add some color around the edges of each circle.  I neglected to do this in the picture because I was in a bit of a hurry and forgot.  Oops.  :-)


Next, dampen both sides of all the scallops with water or stamp cleaner.  I prefer stamp cleaner.  It leaves a lovely scent and stiffens the flower slightly when it dries.


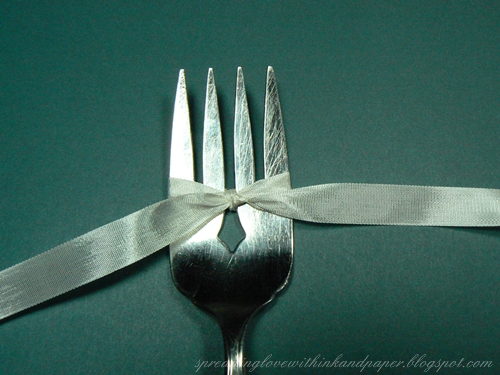
You will need one brad for this project.  Begin with the three smaller circles.  Add each circle to the brad so that they do not stack evenly on each other.  Rotate each circle, as needed, to unevenly stack them to a desired fullness/look.


Continue with the larger scallops, constantly rotating as needed to fill in visual holes and achieve an overall symetrical look.  Close the back of the brad when finished.


Layer by layer scrunch up each circle up and into the center where the brad is.  Go ahead and get and really crinkle the petals here.  It'll give it a more natural look.  (And, if you notice your circles seem a little dry, feel welcome to spray a little more to dampen the paper.)

Why is it better to work with dampened paper?  The paper crinkles more evenly and softly--resulting in a more natural flower.


Here's a picture of one done all in white for a Napkin Fold Card.  To see directions on how to make this remarkably simple card, click here.


Thanks for stopping by!
Blessings,
Brenda

Angela's Flower

This flower was first seen by Angela at a friend's wedding.  The paper flowers were hot glued together to form a ball.  She brought one flower for my daughter to take apart and figure out how it was made.

The original used a straw in the middle and lots of hot glue.  My daughter's version is a little smaller than the original, uses six instead of five pieces, no straw, and is held together with pick tacky tape.  Read on to see how she made it.


This flower is very 3-D and would not suit a card but rather used in some sort of decoration.  Used for this post is CTMH "Footloose" paper with a big pearl opaque from Michaels in the middle.


Here's a side view of the finished flower.  Quite lovely all on it's own, yet very easy to put a bunch together to form a ball--perfect for a baby shower or other party decor.


To begin, you will need a 12 x 12 piece of paper.  Patterned paper makes for a fun finished look.  You will need to cut six, 4" squares for this project.


Score at 2" in both directions.  (Look closely to see the two lines score lines that cross in the middle of the paper.)


Score only one line from one corner to the opposite corner.  DO NOT score a second line.


Measure and mark at 1" on both papers sides of the two corners where the diagonal score line was made.  Then line up the opposing marks and score two more lines across the paper.


Here is a picture of lines drawn to show all the score lines you will have made.  The solid lines will now need to be folded up (a valley fold).  Unfold after each fold is made.  The dashed line will need to be folded down (a mountain fold.)  Unfold after this fold is made.


Flip the paper over.   Fold the edge of one of the scored corners so that the fold starts at one score mark and ends at another.  Done correctly, you will end up with a triangle shape like the one in the picture above.  Do this to the opposite corner, too.  You will only end up with two folded corners when finished.


Flip the paper back over and bend along the folds so that the diagonal fold (marked just for you in dashed lines) retains that mountain fold.


Fold the rest of the way closed.  It will now look like the picture above.


Fold the two sides up along the score lines to get your paper to look like this.


Add some tacky tape along one flap.


Push the two flaps together.  Done correctly they will now be hidden inside like this.


Add a length of tacky tape along the bottom of the paper.  This will help you secure the folded pieces next to each other to form a flower.


That's all it takes.  I hope you have fun trying this on your own!

Thank you for stopping by my blog.  Sending smiles, Joanie (and Brenda)

How to Make a Simple Scallop Flower

This sweet little scallop circle is quick to create and easily coordinates with any paper crafting project.  Simply switch out your cardstock color and ink to make it match whatever you need it for.


Use more scallops for a fuller, more "carnation-like" flower.


Punch three to five scallops with a scallop punch or cut them out on the Cricut.  Sponge around the edges with a color that coordinates with your project.  I have sponge daubers for all of my CTMH ink colors.


Stack the scallops and pierce in the middle with a piercing tool.


Spritz each scallop (on both sides) with a little water or stamp cleaner.  I prefer stamp cleaner.  When dry, the flower smells really nice and is stiff, too.


Secure the dampened pieces with a brad.  Then, beginning with the top scallop, scrunch the scallop (while wet) to crumple it up and around the brad.  Repeat with each layer.


The result is eye-catching.


Here's an example of the flower on a finished card.  To learn how to make a Flap Fold Card, click here.


Thank you for stopping by.  :-)

Blessings,
Brenda

Fork Bow

This is my fork bow tutorial--done just in pictures--just for YOU.  I saved it from my other blog.  :-)


Simply use a serving fork that has an equal number of prongs.

Enjoy!


Thanks for stopping by to take a look.  :-)

Blessings,
Brenda

Making a Pansy


Here is how I made, colored, shaped and mounted my pansy.  I'm really not very good at this so I am hoping you will hang in there with me while I try. 


This circle is 2", but that is up to you as to how large you want your flower.  I thought if I made a larger one it might be easier for you to see.   Starting with 2 circles, you will cut them into fourths.  Laying your circle on your mat it is easy to find the half way point, and drawing two lines to divide it equally.  Next cut out your four pie shapes.  Using a corner chomper to round all corners, except the center of the pie shape,  you can also use your scissors to do this.   Using a Fiskars decorating scissors you go around the outside edge.  Note you are only cutting on the very edge of the paper.  I cut  it from half way up the  side around to the other side.   This will help give the petal that ruffled look.


Next I inked the petals.  Starting with the lightest colors I first inked the edges with Crystal Blue.  You go all the way around and at the corners bring the color in a little further.  Buttercup was applied next.  I used it in the center of the petal and also in the very point of the petal.  Next you use Creme Brulee to the very center.  I added Moonstruck to the outside edge of the petal.  Using a Zig pen I gave the  center of the petal a few vanes.


Next comes the shaping.  Laying your petal upside down, working from the back of the petal take your paper piercer (wooded end) and in a gentle pushing  down motion and going around the edge of the petal and then bring it in a little further.  This really helps shape the  petal.

 I next took a tool from my cricut tool kit, and put little indentations around the edge.


Using tombow adhesive on a 1 1/4 circle, this is the base to mount your petals.
Using two of the petals, setting them on the circle a quarter inch higher than half way point.   Now off setting the top petal over those two petals and down a quarter inch.
Place two more petals on the sides, and then finally finish with the last petal. 


After you have applied the last petal you will add a brad in the center.  This can be
whatever you choose.
Well I tried,  if you have any questions, please just leave me a comment and I will do my very best to answer.   Thanks for being patient with me. 


Have a wonderful day.  Smiles coming your way,     :-)  Joanie

Sparkling Butterflies and More

I asked my daughter to take pictures of a piece of artwork I created a couple of years ago.  It has butterflies.  It has ribon.  It has flowers.  It has bows.  I had so much fun creating this piece (which was originally going to be a card) that it grew into something just right for a shadow box.

Here are the pictures.  I hope they inspire.  Are you into sparkles and more?


Thank you for stopping by.  Have a great day, Joanie