Pages

Showing posts with label Thank You. Show all posts

Pretty Purple Butterflies

I seem to have a hard time with smaller images such as these little images from the stamp set Wonderful You.
They are so sweet when I purchase them that I figure how could you go wrong with these sweet stamps.  Then I try to work with them and find I have difficulty coming up with  designs that compliment those little stamps.  Here is a card that I came up with that turned out okay and I finally used my little stamps.


The card measures 3 1/2 X 4 1/4.  A smaller card made it easier for me to work with the stamp set.
Maybe that is the secret for me.  

Thanks for coming by for a visit, Happy Stamping !!, Joanie

A Cozy Cat Thank You Card

I've got some leftover pieces of white cardstock from another project--just perfect for some mini cards.  Here's a 3" x 4 1/2" card I made using CTMH's "Cozy Cat" stamp set and a Hero Arts stamp set:


Pear And Ruby ink worked well with the Later Skater patterned paper.  And the waterbrush worked perfectly to color the image because I used Memento's Tuxedo Black for the line stamp.
 
 
Now, I'm just wondering why my images have started to look a little grainy from the camera lately?  Do the memory chips wear out?  Hmmmmm.....
 
 
I hope you are having a peaceful Christmas season.  Thanks for stopping by to take a look at the blog!
Blessings,
Brenda

Yikes! I Cut Apart a Stamp on Purpose!

This card is for a very special friend who always brings a smile to my face.  She gave me a very sweet gift last week and I couldn't resist the opportunity to thank her with a card.

Here it is!


I used Memento Tuxedo Black ink for the CTMH wording.  The flowers were inked in Cranberry and Topiary.  Funny thing is: this card is actually blue paper but the picture makes it look white.  Huh.  Oh well.  :-)


The flowers are actually just one flower I messed with and stamped three different times.  Then I took a black writing pen and stitched on different parts of the card to give it a little pizzazz.


The CTMH stamp set was something I picked up years ago when I was a consultant.  I wanted to use parts of the "a huge THANKS for your order" so I just cut it apart.  I figured that was probably the only way that stamp was going to see use, so why not, eh?  :-)


Thanks for stopping by to take a look.  I hope this inspires you to make use of stamps you'd never ever use otherwise.  :-)

Blessings,
Brenda

A Thank You Butterfly


This butterfly is always sure to please me.  It has a soft look to it.  A MS punch was used to accent the bottom of the card.
 
Have a good one, Joanie

Tiny Flower Stamp takes Center Stage

Give a smaller stamp center stage with a thick frame and clever inking.  Here's a card I made using all CTMH products.


To give a solid image stamp set a little pizzazz, ink first in one color (like Sunset) and then randomly sponge in another color (like Chocolate).
 
 
The card sketch is from one of the card confidence books by CTMH.  It's nice to use a sketch sometimes because it takes a lot of the "thinking" out of a project.  Do you ever feel like sometimes you want to stamp but you don't necessarily want to have to dream up a new sketch idea?  I do.  :-)
 
 
Thanks for stopping by to take a look!
Blessings,
Brenda

Thanks for Being My Friend Card

Thanks for being my friend.  Have you ever needed to tell somebody that?  This retired stamp set from CTMH, "Thank You," does just that.

I used it, plus a retired WOTG stamp set, and some new CTMH patterned paper to create this card:


Oh!  And I can't forget to mention the card sketch is from one of the CTMH card confidence books.  In my opinion, it's definitely worth the money to own those books.  :-)


A little masking with post-it notes helped me ink the sentiment in Chocolate before inking the side marks in Sunset.  Easy to do and the results give it subtle pizzazz.
 
 
I also inked the butterfly in Sunset before sponging a little Chocolate onto the stamp.  Again, just a little way to add visual interest to the card.
 
 
Thanks for stopping by to take a look!
Blessings,
Brenda

A Flowering Bunch Card

I'm posting from my mom's house today.  Yippee!

I got to play with one of her stamp sets, "A Flowering Bunch."  Some crochet thread and Martha Stewart glitter glue gave this otherwise simplistic card a little something extra.


CTMH Grey Wool and ink--along with other non-CTMH cardstock--worked well together.  When stamping with my mom and I, we prefer the motto, "Use what you have."  And that I did.

What do you think?


Have a terrific day!
Brenda

P.S.  Thanks for stopping by to take a look.  :-)

How to Make a Diaper Fold Card (or Treat Container)

This Fold Card fits easily in a square envelope.  It's a fun little card and can even work as a treat container--since the pocket expands enough to fit several things.


SO CUTE, right?  :-)  If you like the offset flower, which I made this time using the CTMH circle punch, you can click here to view the offset flower tutorial.
 
 
Here's how to make this easy Diaper Fold Card--which looks terrific when using double-sided paper:


Begin with a very square piece of 8 1/2" x 8 1/2" paper.  (Double-sided paper really is recommended.)


 Fold the square in half diagonally, crisping the fold with a bone folder so it lays nice and flat.
 
Unfold.


Now that you unfolded your square, you can see two triangles made with the fold line in between.  At the tip of the bottom triangle (the triangle facing closest to your body), measure up 2 5/8" and mark it with a dot at that measurement.


Insert your paper into a paper trimmer, lining up the dot in the cutting track.  (Tip: Use the long fold crease to line up the paper evenly in the trimmer.)  Then, use a bone folder to score a line from one edge of the paper to the other--over that little dot you measured.
 
Done correctly, you will now have to fold lines that run parallel to each other.


Take your paper out of the trimmer.
 
Re-fold the first fold so that the square looks like a rectangle.  Then, fold down just the first part of the top triangle along the last score line you created.  (Done correctly, it will look like the picture above.)
 
Unfold that last fold you just made so it looks like one big triangle again.


Using the fold line as your guide, take the left edge of the triangle and line it up under the fold line.  Crisp the crease with the bone folder.  Use the picture above to help you.


Repeat with the right edge of the triangle.


Fold the top flap back down again.  Stick something in the pocket to set the pocket.
 
Remarkably, you will not need any adhesive to keep this fold in its place.


Decorate the pocket and create a card to go inside.  OR, make it a treat box.


Here are a couple of mini versions--which can be used at a baby shower to fill with treats for the guests.


Thanks for stopping by!
 
Blessings,
Brenda

How to Make an "S" Fold, Flap with Pocket Card

This paper.  This paper!  What can I say about this paper except I wish I had a whole file full of it!

  The Clair paper pack was so fun to work with to make this modified "S" fold card.


It looks like a standard 5 1/2" x 4 1/4" card at first glance.  But it is sooooo much more!  I turned this card into what I call a "S" fold, flap with pocket card.  (Now that's a mouthful!)  :-)


Here's what it looks like after you open the "S" fold.


After the flap is open, you can see inside.  What do you think of the pocket? 


It holds a piece of cardstock-weight stationary--perfect for writing that personal message (and enough room to hold all the words).


Here's how to make the "S" fold flap card:
 
1.  Begin with a piece of cardstock that is 12" x 5 1/2".
 
2.  Score a line at 1 7/8", 3 3/4", and 8".
 
3.  At the first line (1 7/8"), fold a mountain fold.  The other two folds are valley folds.  (If you need help understanding what I mean, look at the picture above.  See how the first fold on the left looks like it's coming up off the table--kind of like a mountain rises above the land?)


That's really all there is to it.  There are only five panels to decorate.  The first two are 1 7/8" x 5 1/2".  The second panel is the typical 4 1/4" x 5 1/2".  And the last two panels are 4" x 5 1/2--intentionally made a little bit shorter in width so the card closes easily.  Cut your patterned paper just a little smaller to easily fit inside and leave a little border of the card base peeking through.
 
To add a simple pocket:
- Measure your pocket front to fit in the desired space--but at 1/2" flaps on three of the four sides.
- Seperate the flaps from the pocket front by runing a score line between them.
- Fold the three flaps under at the score lines.
- Cut a curve out of the pocket, if desired.
- Add tacky tap to the pocket flaps and attach to the card.
- Cut a piece of cardstock to fit inside the pocket.


Thanks for stopping by!  :-)
 
Blessings,
Brenda


Sweet Petal Garden


Petal & Outdoor Denim cardstock and ink were the main colors used in this little Thank You card.
The stamp set I used belonged to my daughter and I do not have it or I just couldn't find it.  Anyway all materials used were from CTMH.  A border punch from MS was a little addition to give the card a little something extra. 

Thanks for checking on us today,  have a good one,  :-)  Joanie

A Thank You to my Truly Grand-Daughter


This stamp set was a very special gift from my Grand-daughter.  It is a CTMH set called Tailor - Made.  I used Blush cardstock, CTMH.  The card measures 12" X 5 1/2" , scoring at 3 1/2" and again at 8".  I used all the images in this set except for the sentiment Nice Work.  As you can well see there is allot in this stamp set.  Gram does some sewing for her little lady so this set was especially well thought out.  A MS punch was used on both flaps, and it gave it a lacy feel.  The black and white polka dots was a find at my local Michael's. 

Thanks for checking in today,  always appreciative that you took the time to stop by,  ;-)  Joanie 


Thank You Card for Grandson


This stamp set was given to me by my Grandson.  It is called To You and Yours Season & Nature, CTMH.
The background was dry embossed with the Cuddlebug (Leafy Branch).  I used Desert Sand ink to ink around the edges and also the dry embossing.  A Spellbinders Nestabilities was also used for the Lacey Oval.  I used varies colors on the bird from Tulip to Barn Red and a little accent from a red Marvey Marker.
I really enjoyed this project because my Grandson knew how much Grandma would enjoy this beautiful Cardinal.  Very Special young man!!

Thanks for visiting today, have a great week, and happy stamping, ;-)  Joanie

How to Use Liquid Applique

I don't have a lamb stamp from CTMH, so I used an inexpensive wood-mount from Michaels.  Fortunately, stamping blind (without the aid of see-through acrylic block and stamp) didn't matter--since I planned to cut the image out for the card.


The decision was in which way to use the Liquid Applique.

A.  Follow the directions and get a nice even puff when heated with the heat tool.

OR

B.  Ditch the directions and heat it with the heat tool right after applying a layer.


I picked the one on the left (B).  I ditched the directions and the results created more of a woolly effect.


If you look super closely, you might see I added a little Prisma Glitter to the wool.


The lamb was mounted on "grass"--which was made by simply doing a messy accordian fold to a length of scrap paper and inking it with Topiary green with a sponge dauber.

The patterned paper came from a Recollections paper pack.  It was the first paper pack I had purchased that wasn't CTMH in over two years.  However, this time I did buy one because I knew every single sheet would coordinate with inks and cardstock from Close To My Heart.

The sentiment I've had for so long that I have no idea where I got it.  And the stitching was evenly spaced using one of my favorite CTMH tools, their ruler.  :-)


Here's another card I made a few weeks later using the same sheep stamp but different CTMH paper.


Thanks for stopping by to take a look.

Blessings,
Brenda

Gray & Red Thank You


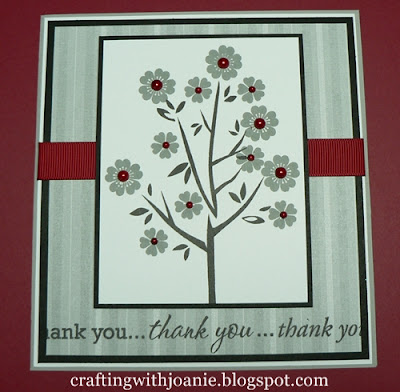
I have allot of paper that I have not used.  So I plan to do just that!  This paper was part of the Bliss paper packet (CTMH).   I used Grey Wool ink on the flowers and accented them using Red half pearl beads.  The flowers and branch are from the stamp set Aspiration (CTMH), and the sentiment was from the set Thank You (CTMH).  I had a good time making this card.  I was inspiration by Gina K. at stamp TV. 

Thanks for visiting today.......smiles......Joanie

Clementine


I used the paper from the packet Clementine, (CTMH) for this little card.  Twilight ink was used around the edges as well as for the sentiment.  The Thanks was from the stamp set Thank You, (CTMH).

I always enjoy making round cards.  When I took the picture I got it a little crocked so it looks a little off , please be understanding of my limited computer skills.  :-)

Hope your having a fun filled weekend.....thanks for coming by......Joanie

Grateful Hearts


Using a stamp set that came with one of my workshops on the go.  I made a flower from the paisley shape.  I have always liked the Juniper ink and it always looks so pretty with white.  Here I used accents of silver with the ribbon and the CTMH Bling Assortment.

Thanks for coming by today....have a great weekend.....:-).......Joanie

Friendship Bouquet


This card was made from the Dotty For You paper packet, and the Friendship Bouquet
stamp set.  The unique look on the flower was a complete accident.  I didn't color the flower with ink other than I had applied white gel pen to give it highlights.  I felt that I had gotten to much of the highlights and added some brown with a marvy marker and then applied the liquid glass.  After it had dried it had a very unique look.  The brown marker had bleed through into the liquid glass.  I think we have a NEW technique.

Thanks for coming by today....happy crafting.....smiles......Joanie

and a Great Big THANKS


Hi there,  this card was made using the paper packet Dotty For You (CTMH).
  I also used the stamp set Friendship Bouquet, and Thank You both are (CTMH) products.  I used the water brush to add color to the flower.  The colors used were Sunny Yellow, Sunset, Creme Brulee & Autumn Terracotta.  The white gel pen was also used to add white highlights.  I used a Mini - Medley (Autume Garder) set of embellishments for the buttons and arrow. (CTMH)

Thanks for coming by today for a visit..........Smiles coming your way........Joanie 

A Smoothy Thank YOU


Hi there, this card was made using the color smoothy a CTMH product.  I also used a Petite Perks stamp set for the sentiment.  The stamp set Eclectic Edges was used for the inked border at the top and bottom.  I dry embossed with the cuddlebug and also added a shape from the cricut cartridge Storybook.  I used an edge punch for the scallops along the base card.

Thanks for stopping by today, have a wonderful day....smiles....Joanie

Dotty for You - Thanks


This card was made from the Dotty For You paper packet from CTMH.  I used Lagoon as the base card along with the frame for the sentiment.  Sunset ink was also used for the thanks, stamp set D1361 (Thank You), CTMH also.  I used the cricut cartridge Fabulous Finds for the frame, page # 82.  I had a MINI - MEDLEY Lagoon set that I used for the brads.

Thanks for coming by to visit today, have a good one.....smiles......Joanie