Pages

Showing posts with label Fold Card. Show all posts

How to Create A Zig-Zag Gate Fold Card


Well it is about time that I posted a card.  I have been busy making doll clothes for my Grand-Daughter for Xmas.  You would think that just because of there size that they would be so easy to make.  Well not at my house!!  Not sewing as much as I use to it takes granny a bit long to do any sewing these days.  Well on to this card.  I saw this card at Luvin Life Friday "Wendy Cranford" site.
It had a different look to it and so I thought I would give it a try.  Hope you like it too, just something a little different for us to play with.


This is the inside when opened. 


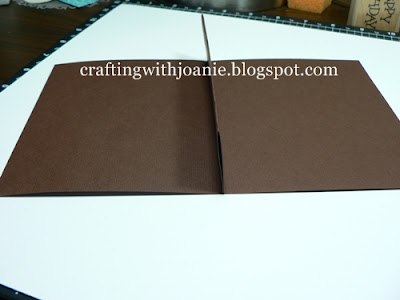
Starting with paper cut at 6" X 10"  (cut two).
Next you will need to score each piece of paper at 4", 6", 8".
The 4" will be the center of the card.  One of the pieces of paper 4" will be set directly on top of the other 4" piece of paper.  This is your center base card.   You will need to cut a diagonal line from the 4" score line to the 2" line on each of the pieces of paper.


If you wish to ink your edges now would be a good time.


When card is put together it should look like the above pic.  You can decorate it however you wish.
I also made a belly band to help it stay closed.  This can be whatever you like.  I think mine was about a 1 1/2" wide .

If you have any questions please feel free to ask, and I will do my best to help you out. 

Thanks for visiting today, have a fun filled crafting weekend, Joanie
 

A Birthday Box Card


Just had to make up another one of the box cards.  This one is made from the CTMH paper packet Dotty for You, retired.  Had fun with this card.

Thanks for looking today and checking out what I have been up to.  Joanie

How To Make a Box Card (A Card with a Secret Box Inside)

Are you as surprised as I was the first time I saw this type of fold card?  It's fabulous!  :-)


I just had to show you the inside first.  Here's what the outside (i.e. card front) looks like:


Here's another box card I made.  They were just so much fun----I couldn't stop at one!  :-)


I found the instructions for this Box Card at Valita's Fresh Folds.  She had found it somewhere and modified it to meet her own needs.  Every now and then you need something that will keep the items inside from falling out.  This will take care of that problem. The finished card will mail easily in a standard envelope.


My finished larger card measured 5" X 5 1/2"

Starting with a piece of paper measuring 8 1/2" X 11"
     Score long side at:  2 1/2", 4", 7", and again at 8 1/2".
     Flip and score at 1 1/2" in from each side, flip and do the other side.


To form the triangle on the top and bottom of the box.  You will find the center of that  rectangle and score from that center point to the fold lines.  These folds allow the box to fold flat when closed.


You will cut in on each of the 1 1/2" lines to the second fold line on each of the corners.
Next you will trim off part of the 1 1/2" score lines to the first fold line.


Give all your score lines a once over with your bone folder.


You will now add your adhesive to corner flaps.


Now you can adhere your corners down to form the box shape.


And there you have it a box card. 
Have fun with this.  It will be sure to please with all ages and any celebration.
If you have any questions just ask away, I will do my best to help. ;-)
 
Thanks for visiting, Smiles coming your way, Joanie 

How to Make a Gift Box with Coordinating Cards


The design for the Gift Card Box came from dawnsstampingthoughts.net.  She has a video and instructions for the box.  If you have never visited her blog it is a must.  Very talented lady, with all sorts of helpful videos.  She has always been an inspiration to me----a must see.
 
There are many other gift card box instructions out there on the internet.  There are even Cricut cartridges with them on them, I think.  Still, I thought I'd post quick directions here.


I decorated the box before I put it together, that is helpful when you can work on a flat surface.
 
The measurements for the box are as follows,
 
Cut 1 piece of paper at 6 1/2" X 6 3/4"     This is the top of the box.
Cut another piece of paper at 6 1/2" X 10"       This is the bottom of the box.
 
You will now make your score lines to fold into the box shape.
 
Starting with the 6 1/2" X 10"
Place your paper in the trimmer or score pal,  long side 10" side.
Score at 4 1/2", and then again at 5 1/2" (These are the folds at the bottom of the box.
Turn paper and place in trimmer or score pal, short side 6 1/2"
Score at 1", and again at 5 1/2" This is the side box flaps
 
With the top of the box, place in your trimmer or score pal at the 6 3/4" side.
Here you will score at 2 3/4", and again at 3 3/4", 
Turn paper to shorter side, and score at 1", and then again at 5 3/4  This is the side box flaps.
 
Trim away the four little squares at the top and bottom of the box, see picture below.


You will now add your tacky tape to adhere the sides together.
 
I hope that the instructions aren't to complicated.  Remember you can view a tutorial at
 
 
This makes a great little gift for anyone.  Thank you for visiting. If you have any questions just leave me a comment and I will do my best to answer them.  Smiles coming your way, Joanie


How to Make an Easy Gift Card Holder Card


Using a 12" x 6" piece of paper and folding it in half , just like normal.  Set paper in trimmer and score a line 1 1/2" from the center fold line on both sides.  This gives you the pocket for the gift card, check, cash etc.
 
 
Now you add your tacky tape, score tape etc. to close the pocket.  Remember to place tape one the outside edge of the original center score line.


Next place card in paper trimmer and cut off the edge of the pocket.  This opens it up to insert your gift.
 
 
Thank you for visiting today.  Have a great day.  Joanie
 

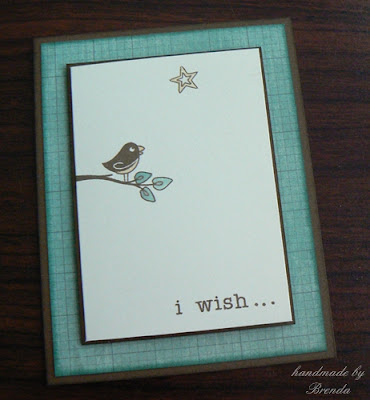
I Wish... (A Card that Opens up a Little Differently)

Today I am missing my mom.  Sure, I can talk to her on the telephone almost anytime.  But I want to spend the day with her.

This card is for you, Mom.  I love you!


I also wish I'd remembered to wipe my fingers before adhering the Colonial white card to the base.  I found three, yes, three, ink smudges on the face of this card.  Part of me is hoping you can't see them.  Then, another part of me is glad for them.  It's a way to say, "Hey!  Learn from my mistakes so you won't have to make them."  :-)


Here's a second picture at a slightly different angle so you can see how it opens in the middle.  I know this might not meet CAS (Clean and Simple) requirements to some, but I think it does.  :-)


I couldn't wait to deliver the card, so I thought I'd post the inside so you can read it here, first, Mom.

Friends.  Do you have a special mom or friend that deserves a card today?  Don't delay.  :-)


This card just happens to use Juniper and Creme Brulee--two yummy CTMH colors picked for this Color My Heart Color Dare


It also has a "creature" of the air on it--which is a requirement for the Creature Feature at Heart 2 Heart.  I hope these ladies don't mind me combining both challenges for one card.  It just worked, ya know?  :-)


Thanks for stopping by to look!
Keep your fingers clean,
Brenda

Oops!  I forgot to mention that I used CTMH's "A Rainbow" and "Tiny Typewriter Alphabet" stamps and Chocolate ink and cardstock with this card.  :-)

How to Make a Onesie-Shaped Card


I got my inspiration from Deb Felts for this Onesie Card.  You will be making a template for this Onesie Card.  Remember that the top of the card (the shoulders) will be on the fold of the card.


Cut your card at 4 1/4" wide and 5" tall.  You will now measure down the side 1 1/2" on each side.
You will measure in 1/2" This makes the arm holes.  From the inside of the armhole draw a line down the side of the paper extending 2 1/2" making sure that at the 2 1/2" point you are at the papers edge.   Trim away paper.  Laying your paper on your mat, mark both the center top and center bottom of this paper.  This gives you the correct place in which to punch out your circles.  At the bottom of the paper (the crotch of the onesie) measure one inch from the center both to the right and left of the
center mark. 


I used a 1 1/4" circle punch for the neck, cutting out a approximately 1/3 of the circle.  The leg openings I used a 2 1/2" circle punch.  Use the marks you made on the bottom to guide you and also along the edge as to where to place your punch. 

I had never made one of these onesie cards before and really had fun with it.  Hope my instructions are of some use.  If you have any questions please leave me a comment and I will do my best to help .  Thanks for visiting,   Joanie

How to Make a Telescoping Card

It may look like an ordinary circle-shaped card, but it isn't.  Oh, no.  It's much, much more!  :-)


Keep scrolling down to see how this card grows...


I changed it up a little this time on this telescoping card.  I used the Artiste Cricut Cartridge page 31, accent 3. for the pretty circles.
 
You will need five circles in all.  I will give you the measurements for this card exactly but it is really easy to change it up to fit the project you have in mind.


Base, 1st layer was cut at 5 1/2  you will only need one of these.
Next is the second layer or the inside of the card,  you will need to cut two and I cut mine at 4 1/2.


You will also mount the third layer over the second layer. That layer is the one with flowers and leaves covering the entire circle.  You will now use a brad at the top of the third layer to secure together.


Next is the sentiment layer.  You will stamp the sentiment and then layer it on
 the decorative circle that was cut out using the Artiste Cartridge, size for that circle was 3 inches.
You will open up the card so the third layer is up and open.  You now secure the final layer (the sentiment) to the card.  When doing this the sentiment needs to be put upside down.  This really helps to get all the layers put down correctly.  It doesn't look like it but trust me it really will work. ;-)


Next is adding about two inches of ribbon to be used as the pull.  It was attached with a brad also.


This is what the card looks like completely open.  Hope I haven't confused you too much.  Give it a try, it really is easy and allot of fun.
 
Thanks for hanging in there with me through my instructions.  Have a great one......Joanie
Wow forgot to mention the stamp sets used.  All are CTMH,  Card Word Puzzle, Words of Comfort Occasions.  The ink colors I used were Petal, and Sweet Leaf.   I also gave the flowers a little color with my chalks.

Thanks for visiting.......Joanie

How to Make a Star Fold Card

A Star Fold Card for almost any Occasion:


To make this 6" card, you will need to start with a piece of paper measuring 12 X 12.  Laying it on your mat you can easily find the center of one of the sides.  Mark the 6" point and draw a line down the paper for about 2". 


Now you can draw a line from the corner left to the center line, making sure it is 12" long, do this again of the other side from right corner to center at 12" point.  Now you can trim off the corners using your paper trimmer.  Sometimes it helps to cut of the excess at the top of the triangle, also you can now erase your pencil line.


You will now find the center of each side of the triangle.  Using those lines you will now score from center point on one side to the center point on the other side.  You will do this three times. 


When you have finished scoring it should look like the picture above.


Now using the score lines you just finished place this score line on the 1 3/4" line on the trimmer and score a second line, do this on the other two sides.


When all score lines are finished it should look like this.  Now with the paper laying flat on the table top fold in all score lines nearest the center, and the second score line on all points should fold out
.


Points or triangles will interlock together.  Here are a few more examples of this card worked up.


I used two different paper packets for these projects both were from CTMH, Florentine was one and the other was Mayberry, also the color Blush was used for the last card.


Thanks for visiting today......have a great crafting day....:-).....Joanie