Pages

Showing posts with label Valentine. Show all posts

How To Make A Pop-Up Box Card

I made this card for Valentine's Day.  It's hard to believe it folds up and can be mailed-----but it can!


You could use balloons, star shapes, flowers, wedding bells, Christmas themed shapes--the options are limitless.


Here's what it looks like from the side.  It really is 3-D.  I was so tickled to find the instructions--I juse have to share them with you!


And now for the instructions:
(They're not hard at all!)


The card base (Or box shape) is 10 1/2" X 5 1/2"

You will score your card stock across the long side at 2 1/2", 5", 7 1/2", and again at 10"

You will turn it to short side and score it once at 2 1/2" (this is the top of the box or the box flaps.

You will trim off the 1/2" score line at the short side or top of the box.


Next you need to cut your box flaps.  Cut to the score line on the 2 1/2" side, top of box.

You will need to make your little inserts for the center of the box, this is where you attach your embellishments.  With a scrap of card cut it to 3 1/2" X 3",  score both ends at 1/2" on each side.
This is were you will add the adhesive to adhere to center of box.  You will need two so cut the card in half, that you had just scored, making sure that you have left all score lines, long side.


Next fold all score lines.


Now your ready to decorate.
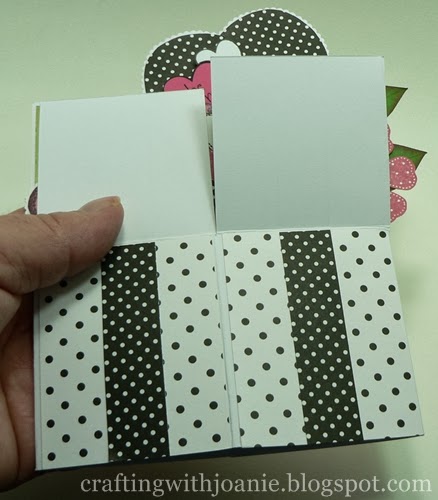


This card folds flat for mailing.  I will use my envelope punch board to make the exact size I will need.

If you have any questions please leave me a comment and I will do my best to help.


Happy Valentine's, thanks for visiting, Joanie

Valentine Card

I wanted to change up the color on this Valentine so I went with one of my favorites called Petal. It is a CTMH color.


Supply list that I used to make this card.

CTMH ink color Petal & Smoky Plum
Cuddlebug folder for the edge of the card and also the inside.
The Stamp Set Amore for the heart shape
One inked canvas button
Smoky Plum Cardstock and White.

I mounted the center of the hearts to the front of the card but put dimensional at the top of the hearts so they would stand out.  The canvas button finished it off.

Thank you for coming by today, have a wonderful stamping, crafting day,  Joanie

Valentine Card

This card was inspired by one I had seen at Gina K. Designs.  I used what products I had to achieve a similar look.


Supplies I used to make this card.

A MS punch for the border
A Spellbinders Nestabilities (Fleur de Lis Squares)
Some polka dot ribbon
The CTMH stamp set ( Holiday Tags Occasions) sentiment
White and Black Card


Valentine Card

Hi there,

This little Valentine was fun to make.  It reminds me of the shaped cards I gave as a little girl.  It was all about the shape back then.  I made my own pattern and cut out two heart shapes.  With the one in the back I scored it about a half inch down.  Doing it this way it insures that the card will open easily and that the front will not have a crease in it.  In other works with the scoring you have made a hinge.  I used score tape to connect the two separate hearts together.


I added a strip of paper across the top of the inside of the card.  In this way a gift card or a little cash will be secure inside.

Thanks for visiting, have fun with your Valentine's,  Joanie

A Teenage Valentine

Here's a valentine I made using CTMH's "Whooos Your Valentine" and "Capture the Date."


I wanted to create a teenage valentine using sketch 276 from Clean and Simple Stamping.


Here's a close-up of the upper part of the card:


I wanted Cocoa-colored legs to match the Cocoa-inked owl body, so I took and inked the exclamation point from the sentiment, turned it upside-down, and stamped it twice for legs.  (I didn't have a matching marker, so this was the easiest I could come up with.)

The Vineyard Berry and Cocoa ink worked nicely with Colonial White (cream) and Kraft cardstock.


Thanks for stopping by to take a look!  It was fun to use numbers and hearts in place of the circles in the sketch.

Blessings,
Brenda

A Valentine of Kisses

I saw a sketch on the Clean and Simple Stamping site and wanted to give it a try.  Here's a card that is a break from my normal.  It is what I'm calling an over-sized envelope card.  The personal message is securely tucked in the envelope and the envelope is adhered to a white cardstock mat.


The sentiment is actually portions of three different stamps from Close To My Heart.  The "&" symbol is from "The Works Alphabet."  I also pulled words off two stamps sets from the "You Are My Happy" stamp set.  A little strategic inking was all that was needed to "weld" these words together and give the appearance of one stamped sentiment.


The above picture is how it looks with the personal message removed from the envelope.  The kisses really do appear to be tumbling from the envelope.  I like it so much that this just might be the card to give my husband this year.  :-)

I lined the pre-made envelope with some old red cardstock that I got at least twelve years ago in another state.  It has flecks of other colors in it and I just really like the richness and depth of red.  (Sadly, it is one of the few remaining scraps I have left.  Do you ever feel a little sad when you've about used up some of your favorite paper?  :-) 

And CTMH's Vineyard Berry and Cocoa inks joined in on the stamping fun.  :-)


Here's what the original sketch from Clean and Simple Stamping looked like:


To change things up and yet still hold true to the sketch, I flipped the image and used kisses in the place of the circles.  :-)


Thanks for stopping by to take a look!
Blessings,
Brenda

How To Mask Quickly with Lined Paper

Here's a card I made using CTMH's "A Garden," "Universal Backgrounds," and "Whooos Your Valentine" stamp sets.  I also made Smoothie my color of choice--to meet the requirement for the Color My Heart color dare for this week.


I manipulated the flowers by bending the clear stamp in different ways and then stamping each way on the white square--giving the appearance of one stamp.  MS Glitter Glue and White Applique added a little pizzazz to the stamped images.


To make the bit of color and pattern across the center of the card, I grabbed the first thing that I saw--a random sheet of lined paper.  I tore it and laid it across the part of the Smoothie cardstock I wanted to ink.  Then I stamped the background stamp twice and sponged across the open surface.  When I lifted up the lined paper, the torn look remained in ink.

Usually I would use painter's tape for this type of masking, but this worked well--and even afforded me a larger area for the stamp to spill over on.


Thanks for stopping by to take a look!
Blessings,
Brenda

Dog-Gone Cute Valentine Card

I've been working on valentines and wanted to make something new and fun for a young recipient.  Months ago--maybe even a year or two (I cannot remember)--I saw a puppy card where you pull the tongue and the ears flip up.

So, this morning, after searching the internet, I saw a couple of options.  Here's the pattern I found from mmmcrafts.  Although I changed the size up a little but the pattern is basically the same.  Out of respect for the original artist, please refer to the above link for the pattern.  I did add the spot around the eye, made it into a valentine card, and changed the way the eyes look--all while using CTMH colors, of course.  (I always like using their matching inks and cardstocks.)


Cocoa, Cashmere, Champagne, Pacifica, and Ruby colors were used on this card.  I also mounted the entire thing on white cardstock.  I prefer the Georgie Pacific cardstock from Walmart.  It's nice and thick and is easy on the pocketbook.  :-)


This is what the card front looks like when you pull on the tongue.  The action of pulling the tongue makes the ears flip up and slightly in.  Cute, yes?  :-)


The eyes were a new idea I came up with.  They were made using two stamps using Cocoa and Cashmere ink. 

1. First I stamped the outer circle with a round stamp from CTMH's "Connections" stamp set using Cocoa ink. 
2. Then I stamped the sun burst stamp from "Dream Big" in Cashmere ink (just off center). 
3.  I finished the eye background by sponging Cocoa around the edges to hide the paper's white inner core.  And I sponged around the eye ball to soften the lines made from the sun burst.
4.  I punch each pupil out with a basic hole punch, sponged the circle to darken it, and made white marks with a white gel pen.


Because I attempted a new-to-me pull card style and created a new eye look, I feel that qualifies me for the Heart 2 Heart Challenge for this week. 


Please CLICK HERE to see other exciting paper crafting inspiration from one of my favorite blog challenge sites!  :-)


Thanks for stopping by to take a look.
Blessings,
Brenda

Quick and Easy Stitched Pattern

Here's a simple card I made for Valentine's Day:


This card went together pretty fast.  The stitching is just one long long stamp from CTMH's "Stitched Wonder" stamp set that I repeated with different colors.


Ruby, Blush, and Baby Pink worked together pretty nicely--though you can pick any colors you want and just repeat the pattern.  It'll work (and not just for Valentine's Day).  :-)


Thanks for stopping by to take a look.
Blessings,
Brenda

Stitched Valentine

Here's a little 3" x 6" card I made using scraps from the card I made yesterday and the CTMH stamp set "Stitch Wonder."  Oh.................and I used a sketch from the book "Wishes" for inspiration.  Fun and easy!


Colonial White, Cocoa, Cashmere, and Ruby colors were used to create this sweet card.


I used just a portion of the stamp above to make two small "stitched" hearts in the bottom right corner of the card.  All I did was wrap part of the stamp I didn't want up the side of the block and then only ink the heart by using the corner of the Ruby ink pad (inking only the heart but not the dashes).


I'm having so much fun stamping.  I might just skip the dishes and laundry for a bit and go play some more.  (hee hee)  :-)


Thanks for stopping by to take a look!
Blessings,
Brenda

A Valentine Card for a Teenage Girl

Valentine cards already?  Well, yes.  You see, my Christmas cards are all in the mail and so my creative thinking has moved on to Valentine's Day.


Here is a cute and trendy card using CTMH and My Minds Eye supplies:


I masked a sentiment from CTMH's "Mad About You" stamp set so that the word "valentine" was all that was inked and stamped onto the MME paper.  CTMH's Ruby cardstock worked really well with the MME patterned paper, don't you think?  :-)
 
A little twine from Hobby Lobby and a few CTMH brads finished the look.
 
One valentine down.  Yippee!
 
 
Has anybody else out there started thinking past Christmas yet?  Just curious......
 
 
Thanks for stopping by to take a look!
Blessings,
Brenda

How to Make a Telescoping Card

It may look like an ordinary circle-shaped card, but it isn't.  Oh, no.  It's much, much more!  :-)


Keep scrolling down to see how this card grows...


I changed it up a little this time on this telescoping card.  I used the Artiste Cricut Cartridge page 31, accent 3. for the pretty circles.
 
You will need five circles in all.  I will give you the measurements for this card exactly but it is really easy to change it up to fit the project you have in mind.


Base, 1st layer was cut at 5 1/2  you will only need one of these.
Next is the second layer or the inside of the card,  you will need to cut two and I cut mine at 4 1/2.


You will also mount the third layer over the second layer. That layer is the one with flowers and leaves covering the entire circle.  You will now use a brad at the top of the third layer to secure together.


Next is the sentiment layer.  You will stamp the sentiment and then layer it on
 the decorative circle that was cut out using the Artiste Cartridge, size for that circle was 3 inches.
You will open up the card so the third layer is up and open.  You now secure the final layer (the sentiment) to the card.  When doing this the sentiment needs to be put upside down.  This really helps to get all the layers put down correctly.  It doesn't look like it but trust me it really will work. ;-)


Next is adding about two inches of ribbon to be used as the pull.  It was attached with a brad also.


This is what the card looks like completely open.  Hope I haven't confused you too much.  Give it a try, it really is easy and allot of fun.
 
Thanks for hanging in there with me through my instructions.  Have a great one......Joanie
Wow forgot to mention the stamp sets used.  All are CTMH,  Card Word Puzzle, Words of Comfort Occasions.  The ink colors I used were Petal, and Sweet Leaf.   I also gave the flowers a little color with my chalks.

Thanks for visiting.......Joanie

CTMH meets My Minds Eye

Here are a few of my favorite things:

- Close To My Heart My Acrlyix stamps (the best clear stamps in the industry)

- My Minds Eye 6" x 6" double-sided, patterned paper packs (the patterns are small and work nicely for cards------plus they coordinate beautifully with CTMH ink and cardstock)


I used Chocolate and Tulip cardstock with MME's "Dolled Up" paper pack.

This card was originally going to be a standard-sized card, but I made a big OOPS when my ink-stained finger left a mark on the cardstock.  I ended up writing the "i love you" on some scrap paper, notching it to look like a banner piece, and mounted it with foam tape over the smudge.


I also like the concept of the 6" x 6" paper packs, because they are so easy to store.  I'm thinking of getting a little basket to sit on my desk and just keep these little paper packs handy.  They don't take up very much space and that is always a good thing.  :-)
 
What are are few of your favorite cardmaking things?
 
 
Thanks for stopping by!
Blessings,
Brenda

Check out the Card my Granddaughter Made

My granddaughter made this card, took the picture, and allowed me to share it with you here.  It's a valentine for her BFF.  She turned the stamps into raspberries and strawberries with a coordinating message inside.

She was so pleased with herself as she had come up with the idea all on her own.  I think it is great that my daughter allows her daughter complete access to all the stamping supplies and encourages her creativity.


Thanks for stopping by!  Sending smiles, Joanie

Valentine Card

 
For this Valentine card I used the paper called Sweethearts from CTMH.  The stamp set Spring was used for the different hearts.  I stamped them on pink paper and cut them out.  Using the MS glitter glue I added some extra glitz.  It finished off the card really well. 
 
Thanks for stopping in today...have a happy stamping day..... ;-) ...Joanie

A Simply Sweet Valentine Card

I love making my own background for cards.  The card here shows how I used the "asterisk" from CTMH's "Tiny Typewriter Alphabet" and flowers from "Girls Rock"--in Sweat Leaf, Baby Pink, and Buttercup.


The scribbly hearts across the bottom and the "love" sentiment are also from "Girls Rock". 


 I added a touch of MS Glitter Glue for some pizzazz.
 
 
Have you ever thought to use your stamps for something different than originally intended?  The asterisk made such a sweet and tiny flower.  I challenge you to find new uses for your stamps, too.
 
 
Thanks for stopping by.  :-)
 
Blessings,
Brenda

A Double Front Valentine's Card

Look closely.  These pictures are of just one card.  It opens and then opens again.


This is the front.  Don't you just love the heart with the gold embossed "LOVE?"


Inside this first flap is more love.  Which reminds me: All the stamps come from CTMH's "Amore" stamp set.  Love it!


And this is the final flap.  Did you notice how each layer opens to a larger layer?  I'm going to make another one of these and take pictures so you can see how it all goes together.
 
 
Annnnnnyway, I found this card the other day and thought it might work well with this stamp set.  Only problem was all the main images of this stamp set were a little larger than needed.  Never fear.  I went ahead and gave it a try anyway.  And I'm glad I did. 
 
The base card is cut at 5 1/2" x 8 1/2" and from there I had to adjust so much that I can't give you exact measurements for the rest of it.  There is the first front and then you open it and there is another image and then you open again to reveal the inside.  I used CTMH cardstock and ink in the color Vineyard Berry.  A MS punch was used for the  border on the inside, and a Cuddelbug folder was used for the dry embossing.  I also used gold embossing powder for the word Love on the front.
 
Thank you for checking on us today,  Happy Crafting, ;-)  Joanie 
 

How to Reverse the Image of a Stamp

The two dogs on this card are made with just one stamp.


Have you ever used a brayer to transfer the image and reverse the direction?


Here's how to reverse the image.
 
1) Ink your image.
2) Roll your clean and dry brayer over the inked stamp.
3) Roll your brayer on the paper you want the image on.
4) That's it!  The brayer reversed the image!


Supplies used:
- CTMH "Buzz and Bumble" paper
- New England Ivy, Cranberry, and Colonial White cardstock
- "A Bowwow," "Chairs to You," and "A Friend Like You" stamp sets
- Colonial White Ribbon, Mocha Pearl Opaques, and a White Gel Pen
 
 
Thanks for stopping by!  :-)
 
Blessings,
Brenda

How to Make Glitter Hearts using the Cricut and Shipping Tape


Hello !!  My inspiration for this card came from Dawn at dawnstampingthoughts.  I made the card two different ways so that it would be of help to you if you would like to reproduce it.  The hearts on this card were cut out using the cricut cartridge Plantin School Book.  When cutting out the hearts you need at least a half inch on the sides and at least that much between the hearts.   After loading the paper I used the arrow directional buttons to give me the correct distance between hearts. (Remember to count the number of times you pushed the button so that you can line up the next heart at the very same place but lower than the previous heart.  I counted in 10 clicks and also down 10 to begin.  After the first heart was made I only used 5 clicks between the hearts.  I also used the cuddlebug folder Geometric Rings.  A MS punch for the decorative borders.  I glittered the hearts using packaging tape.  After the hearts are cut out you simply apply the tape to the back of your project.  When you flip it over you can now apply your glitter.  I gave it a couple of applications to make sure that it was fully covered.


To make these hearts I used a MS heart punch.  I made the center heart and used the sides of the punch to line up for the next one on either side.  This time I just used scotch tape.  Worked as well as the packaging tape but needed to apply two strips of it to cover the heart.  Again after applying the tape flip it over and sprinkle your glitter on.  I used a scratch piece of paper to put over my work and went over all with my fingers.  After clearing off the excess I found that another application was needed just to give it full coverage.  Cloth lace was added to this one and gave it another look. 

Thanks for visiting today, hope you try these glitter hearts, fun to make, have a good one, Happy Crafting,  ;-)  Joanie