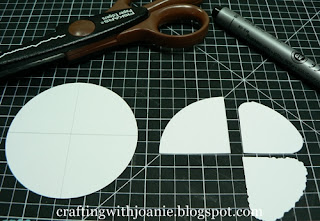
Here is how I made, colored, shaped and mounted my pansy. I'm really not very good at this so I am hoping you will hang in there with me while I try.
This circle is 2", but that is up to you as to how large you want your flower. I thought if I made a larger one it might be easier for you to see. Starting with 2 circles, you will cut them into fourths. Laying your circle on your mat it is easy to find the half way point, and drawing two lines to divide it equally. Next cut out your four pie shapes. Using a corner chomper to round all corners, except the center of the pie shape, you can also use your scissors to do this. Using a Fiskars decorating scissors you go around the outside edge. Note you are only cutting on the very edge of the paper. I cut it from half way up the side around to the other side. This will help give the petal that ruffled look.
Next I inked the petals. Starting with the lightest colors I first inked the edges with Crystal Blue. You go all the way around and at the corners bring the color in a little further. Buttercup was applied next. I used it in the center of the petal and also in the very point of the petal. Next you use Creme Brulee to the very center. I added Moonstruck to the outside edge of the petal. Using a Zig pen I gave the center of the petal a few vanes.
Next comes the shaping. Laying your petal upside down, working from the back of the petal take your paper piercer (wooded end) and in a gentle pushing down motion and going around the edge of the petal and then bring it in a little further. This really helps shape the petal.
I next took a tool from my cricut tool kit, and put little indentations around the edge.
Using tombow adhesive on a 1 1/4 circle, this is the base to mount your petals.
Using two of the petals, setting them on the circle a quarter inch higher than half way point. Now off setting the top petal over those two petals and down a quarter inch.
Place two more petals on the sides, and then finally finish with the last petal.
After you have applied the last petal you will add a brad in the center. This can be
whatever you choose.
Well I tried, if you have any questions, please just leave me a comment and I will do my very best to answer. Thanks for being patient with me.
Have a wonderful day. Smiles coming your way, :-) Joanie


4 comments:
Not good at this, eh? Riiiight! You did fantastic! You're a natural! I look forward to making one. Thanks for the great tutorial. :-)
Thank you! I am going to try this out. I love purple pansies.
Wow! looks beautiful!
I just LOVED that card that you made. Thanks so much for sharing this technique!
Post a Comment